Graphing within psql

I mentioned this on HN years ago but it’s nifty so add it here.

You can graph SQL output with gnuplot without leaving the psql (Postgres client) command-line.

Because @fusiongyro commented “This is incredible! I only wish it were a little easier to do on the fly,” I inquired on the amazingly helpful pgsql-general list.

There are two approaches: client-side and server-side.

  • Ian Barwick explained how to put all the prep stuff into a psql script, define your query and invoke the script.
    
    barwick@localhost:~$ psql -U postgres testdb
      psql (9.2.3)
      Type "help" for help.
    
      testdb=# set plot_query 'SELECT * FROM plot'
      testdb=# i tmp/plot.psql
    
    
                                        My Graph
    
        4 ++---------+-----------+----------+----------+-----------+---------**
          +          +           +          +          +           +     **** +
          |                                                          ****     |
      3.5 ++                                                     ****        ++
          |                                                  ****             |
          |                                              ****                 |
        3 ++                                         ****                    ++
          |                                      ****                         |
      2.5 ++                                *****                            ++
          |                             ****                                  |
          |                         ****                                      |
        2 ++                    ****                                         ++
          |                 ****                                              |
          |             ****                                                  |
      1.5 ++        ****                                                     ++
          |     ****                                                          |
          + ****     +           +          +          +           +          +
        1 **---------+-----------+----------+----------+-----------+---------++
          1         1.5          2         2.5         3          3.5         4
                                         Servers
    
      testdb=#
    
  • Sergey Konoplev explained how to do it with a server-side function – you need gnuplot installed on the db server and then you can use

select just_for_fun_graph('select ... from ...', 'My Graph', 78, 24, ...)

Binding an SSH launcher to a GNU Screen hotkey

I have a confession to make. I use SSH to access servers.

I tell the sysadmins I teach to make changes to their servers using configuration management, but:

(a) most clients I work with are just starting to use configuration management so we use SSH to access the systems that aren’t under in configuration management yet, and

(b) I enjoy troubleshooting issues rather than just shooting my IT infrastructure in the head and instantiating a new one that might have the same issue. But this post isn’t about immutable infrastructures. It’s about SSHing to servers.

From “things that make me happy”, I added two lines near the top of my GNU Screen config file, .screenrc:


# start ssh launcher loop

screen -t launcher /bin/sh -c 'while true; do echo -n "Hostname: "; read host;  screen -t $host ssh $host; clear; done'

# bind ctrl-K to "switch to window 0 which contains the SSH launcher"

bindkey "13" select 0

Now when I want to open a new session, I press Ctrl-K and enter the hostname, and GNU Screen will start a new window, titled with the name of the host, running an SSH session to that host.

It’s the little things in life.

Update:

Now that I’ve used this for a day, I remembered the problem with this setup — after you launch an ssh session, if you press the screen command key twice to go back to the previous window, you end up in the launcher window instead.

When I worked at EarthLink, I made a little shell script similar to this that I called with screen’s “exec” command and did some gnarly input/output redirection where the script took my input and it’s output was fed back to the screen as if it was user input and that contained the command to launch the ssh session. I didn’t save it; looks like I’ll have to reconstruct it.

Also, the latest version of GNU Screen is rather improved: you can renumber windows, split windows vertically, etc.

Yes, I know about tmux. I’m just used to screen. 🙂

Time Management and Git training at Ohio Linux Fest

I am pleased to announce that Mike Weilgart and I will be delivering professional training for Ohio Linux Fest Institute in October.

I will teach “Time Management for System Administrators” and Mike will teach “Git Foundations: Unlocking the Mysteries”.

You can now register for Ohio Linux Fest.

On a personal note, I enjoy walking about Columbus, lots of history there, and I love walking into German Village.

Using Ansible to change sshd configuration

One of my clients is at the ssh “for” loop stage of automation maturity, so I installed Ansible. Because of selinux and Python version issues, I’m using the “raw” mode (which doesn’t require Python on the hosts, it just runs raw shell commands).

What follows is an example of using Ansible raw mode to make changes at scale.

Problem

A developer requested:

Please, activate these option on XYZ servers in the /etc/ssh/sshd_config
so I can stay connected while debugging:

ClientAliveInterval 15
ClientAliveCountMax 3

Solution

First, check current setting, so that I know what we have in place now (starting point):

$ ansible all -i /tmp/hosts  -m raw -a "grep ClientAliveCountMax /etc/ssh/sshd_config"  --ask-pass --one-line --user=root
SSH password:
X | success | rc=0 | (stdout) #ClientAliveCountMax 3

Y | success | rc=0 | (stdout) #ClientAliveCountMax 3

Z | success | rc=0 | (stdout) #ClientAliveCountMax 3

$

Uncomment the line, enabling the setting:

$ ansible all -i /tmp/hosts -m raw -a "sed -i /etc/ssh/sshd_config -e 's:.ClientAliveCountMax 3:ClientAliveCountMax 3:'; grep ClientAliveInterval /etc/ssh/sshd_config"  --ask-pass --one-line --user=root

$ ansible all -i /tmp/hosts -m raw -a "grep ClientAliveCountMax /etc/ssh/sshd_config" --ask-pass --one-line --user=root
SSH password:
X | success | rc=0 | (stdout) ClientAliveCountMax 3

Y | success | rc=0 | (stdout) ClientAliveCountMax 3

Z | success | rc=0 | (stdout) ClientAliveCountMax 3

$

Summary of changes:
Before: #ClientAliveCountMax 3
After: ClientAliveCountMax 3

Rince and repeat for ClientAliveInterval.

Now reload SSHd config:

$ ansible all -i /tmp/hosts -m raw -a "/etc/init.d/sshd reload"  --ask-pass --one-line --user=root
SSH password:
X | success | rc=0 | (stdout) Reloading sshd: [  OK  ]

Y | success | rc=0 | (stdout) Reloading sshd: [  OK  ]

Z | success | rc=0 | (stdout) Reloading sshd: [  OK  ]

$

Infrastructure Management at Scale

I recently spoke at Digital Media Educators Conference (DMEC) on Infrastructure Management at Scale and the skills educators need to impart to up and coming system administrators.

This conference serves the California community college system, which is dear to my heart. My mother worked at West Los Angeles College library her entire professional life in America, since we arrived in 1988. I used to volunteer and help her out with shelving in the summer. I was a very poor helper since I kept getting distracted by all the delicous books and did more reading than shelving.

While in high school I took computer programming, math and English at West Los Angeles College and at Santa Monica Community College, at first during summer break and then concurrent with eleventh grade, which allowed me to go to University instead of going to 12th grade.

So I have a personal connection to the California community college system and I jumped at the chance to contribute a talk:

Cover slide

Because my presentation was in the Data Representation track, I focused on Inventory and Compliance Reporting so I could show off CFEngine’s slick UI.

I started by laying out CFEngine’s philosophic groundwork:
Promise Theory and the advantages of voluntary cooperation and distributed work over the limitations of imposed direct control.
– The advantages of pull over push (see “Push versus pull” in Deconstructing the `CAP theorem’ for CM and DevOps by the author of CFEngine for more on this), and
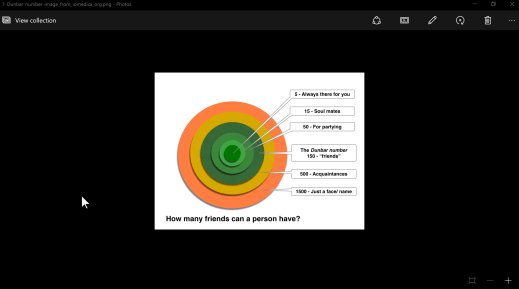
– The Dunbar numbers which constrain the quality and quantity of relationships sysadmins are able to have with their infrastructures. The rest of the talk demonstrated how the design of CFEngine uses Dunbar numbers to focus the information it presents.

Dunbar numbers

We also talked about what computer system administration IS, and what the challenges are and how we handle them.

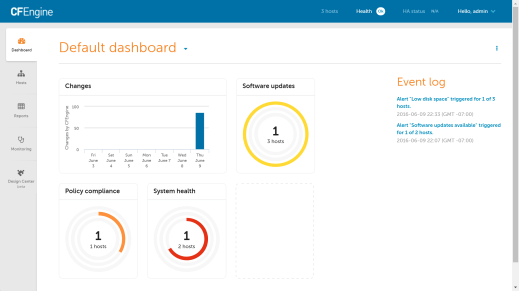
Then I introduced the CFEngine dashboard:

Dashboard 1

I pointed out the header which holds the host count (2, including the hub itself) and the health indicator (OK); the graph of Changes made by CFEngine, the fact that both of our hosts have Software Updates available (1 alert triggered on 2 hosts), and that we have 100% compliance on promise compliance and system health (green check-marks).

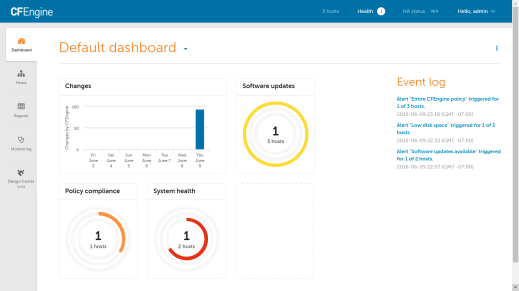
The next slide, adding a third host (notice the hosts indicator up top), shows how the Alert for Software Updates changes to a 2/3 arc, as, right after adding the host, as at this point the hub knows 2 out of 3 hosts are missing software updates. Once the agent runs on the third host and the hub collects the report, the Alert will change back to a full circle with 3 out of 3 hosts are missing software updates.

Dashboard 2

The next slide illustrates how CFEngine communicates the severity of the alert: critical issues are indicated in red, less severe in orange (amber for you Aussies), and mildest level is yellow. I induced a policy non-compliance situation on one of the three hosts (e.g., promised a file edit but prevented CFEngine from accessing the file by filling up the disk), so the Promise Compliance alert spans 1/3 of the circle (1 out of 3 hosts).

Dashboard 3

Notice also that if CFEngine is unable to collect reports from a host or if an agent stops running on a host, the health indicator at the top of the screen changes from OK to a red number indicating the number of issues:

Dashboard health indicator

You can see the number and type of issues:

Dashboard health detail

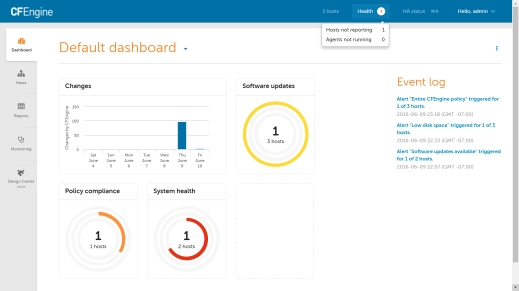
Notice that the Dunbar numbers are in play here: CFEngine tells you there are issues, and if you want more data, then you can have it. But it doesn’t throw all the detail at you at once, that would be too much.

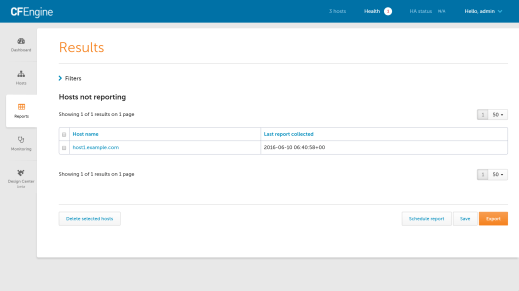
You can get more detail on which hosts are not reporting by selecting “Hosts not reporting” from the health indicator menu:

Hosts not reporting

You can then select a host in the list of hosts not reporting to see the info for that host (host detail).

Health issues host list

Host detail

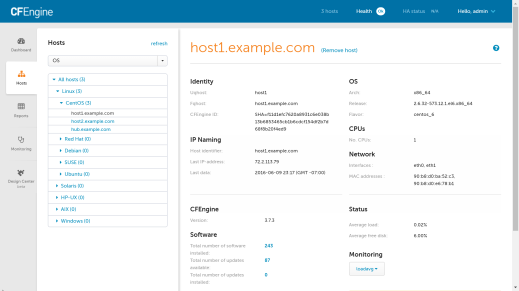
That actually takes us to the “Hosts” tab.

The “Hosts” tab starts in the “all hosts” view, where you see the promise compliance summary for your infrastructure:

All Hosts

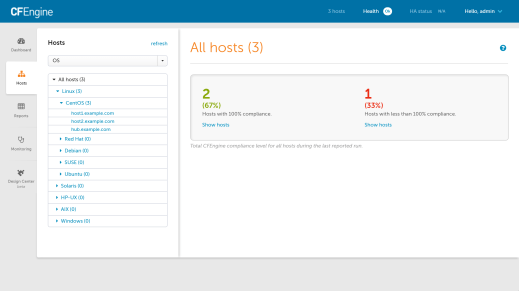
You can list the hosts that have less than 100% compliance:

Non-compliant hosts

You can see which promises were not kept on each host:

Promises not kept by host

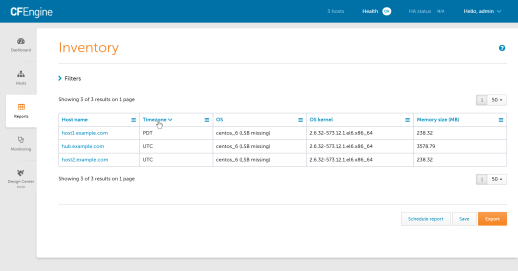
And that takes us to the “Reports” tab. There are many reports available but let’s take a look at the Inventory Report. It starts out with four basic columns but you can add more:

Inventory 1 - Start with 4 columns

You can extend inventory collection by writing CFEngine promises, for example, here I’ve added inventory of the host’s timezone:

Inventory 2 - User Defined

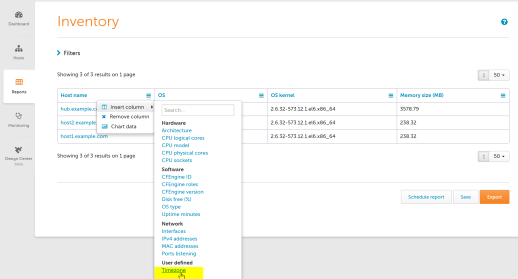
Let’s say our company policy says all hosts must be in the UTC timezone. But in reality we have this:

Inventory 3 - Timezone Detail

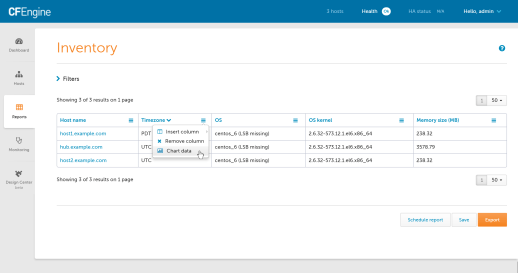
You can sort the column contents by selecting the column heading, this groups the outliers and brings them into view:

Inventory 4 - Sort

You can graphically summarize column contents by selecting “Chart Data”:

Inventory 5 - Summary Chart Dialog

Voila!

Inventory 6 - Summary Chart

Hover over a slice to get more detail:

Inventory 7 - Chart detail

Or switch to column view:

Inventory 8 - Column View

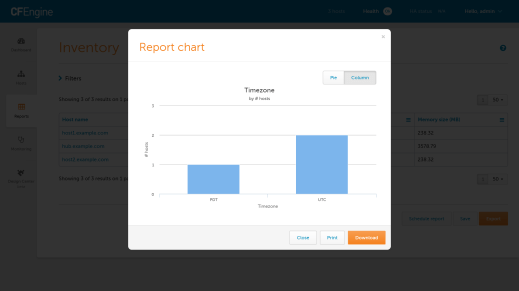
Here is another example:

Inventory 9 - AD status

The charts can be exported and embedded in reports to management, auditors, etc.

Want to give CFEngine Enterprise a try? It’s very easy to download and install the hub package.

Feel free to email me if you have any questions!