Sysadmin war story: “The network ate my font!”

About 15 years ago, I was the only UNIX sys admin in a factory,
and I was asked to help with a “network issue” which hit the
Help Desk.

The problem, it was explained to me, was that the network was
eating the MICR font (Magnetic Ink Character Recognition — machine-readable font) on the checks.

Look at the last line on the below check image for an example of MICR font.

CanadianChequeSamplePAR.png

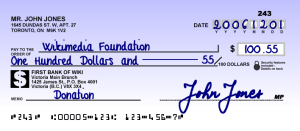
Image credit: Wikipedia

The finance office was in Toronto and they were printing checks to
printers in Toronto and in Hollywood, California. The checks were
coming out OK in Toronto but in Hollywood the bank routing number
and account number was printed in regular font instead of in MICR
font. The Toronto printer was printing numbers in MICR.

I said there is no way the network is “eating” the MICR font.
That’s not how networks work! Show me the check. Sure enough,
the account number and the routing number (and the check number)
were all in regular font.

I asked the Toronto office to fax me the check printed there —
it had the MICR font. Same check, mind you!

I asked the guy responsible for maintaining the finance system
if anything changed recently (as the problem had just started)
and he was very sure there was no change. Real head-scratcher!

I ended up capturing the postscript of the check using tcpdump
as it was printed from Toronto UNIX server (that was running
the finance system) to the printer in Hollywood and poured over
the dump.

What I found was that the postscript image was referencing a font
but the font was not included into the image. So how did this
ever work?

Digging into this a bit deeper with the finance tech guy, why,
yes, there is a checkbox in the check editor for whether to
encapsulate (bundle) the font in with the image and by default,
every time you go in to edit the check, the box is unchecked!

However the last time the check image was edited was months ago.
Why did it stop working only now? Any guesses?

Turns out the printer had a cache for fonts and was using the
font cached from the earlier check image which included the
font! Moreover, the Toronto and Hollywood offices were on a
different printer maintenance schedule — and as part of the
maintenance the printers are rebooted which clears the font cache!

To confirm this, we rebooted the Toronto printer and it stopped
printing the MICR font on the check.

The resolution was to edit the check image and check the “include
fonts” checkbox.

If you are in the San Francisco Bay Area next month, drop by the
USENIX LISA conference
next month, you can hear some great war stories there.

I’ll be there to teach “Setting up CI/CD pipelines”.

My colleague Mike Weilgart and I also teach:
“Shell Basics: Under the Hood”,
“Git Foundations”,
“GitLab CI”,
“Time Management for System Administrators”,
and more.

Email me to ask about training your IT staff.

What I learned at LISA 2016 conference

USENIX Annual Technical Conference and LISA are the first professional conferences I went to as a fledgeling sysadmin. USENIX will always hold a special place in my heart. I attribute my professional success to regular training at USENIX conferences.

I really enjoyed LISA ’16 in Boston.

This year I exhibited, promoting our training services. I learned that people are looking for training on Machine Learning (Big Data) and on Go; and I got to show Tom Limoncelli a success story from my “Time Management for System Administrators” training at Ohio Linux Fest that I had received just that morning.

At the Training Sysadmins BoF, I learned Adobe has a kick-ass in-house training program that keeps getting better. Really impressed with Adobe culture!

It was revitalizing to hear the passion for improving society at the Educating Sysadmins BoF. Keep up the great work!

At the LOPSA Annual Community Meeting, I was awarded a LOPSA challenge coin in recognition for running the Los Angeles chapter and signing up new members. I love it! Thank you!

Nick Anderson asked what are the top three things I learned at LISA.

First, I just want to say “kudos!” to the Program Committee – lots of great (and very modern) content!

  • I learned about the Jupyter Notebook programming and data visualization environment in the class on Machine Learning.
  • I loved the talk on unikernels. Technology keeps changing and LISA helps me keep up.
  • The closing session, “SRE in the Small and in the Large” demonstrated SRE is not just for Google scale — even smaller organizations can reap large benefits from applying “a stitch in times saves nine”. Read the book!

Nick, the keynote by Jane Adams on emergence in complex systems was mindblowing — look for it online soon! (Here is a shorter one, from three years ago.)

My favorite part of the conference was hanging out with my LISA friends. Hope to see you in October in San Francisco!

Setting up a Postgres Sandbox

I’m a fan of disposable sandboxes using Vagrant and VirtualBox.

I’ve been using Postgres on the job for nearly a year, and a while back I decided it was time to have a dedicated Postgres instance on my personal computer, on a virtual machine, just to play around with.

I’m using a Mac, but the steps below should work without change for Windows or Linux. Let me know in the comments if you run into any problems following these steps!

How to set up a reproducible Postgres sandbox inside a disposable VM

  1. If you haven’t done so already, install Vagrant and VirtualBox.

  2. Choose a Vagrant base image. For my own purposes I chose the vanilla base box puppetlabs/centos-6.6-64-nocm (which comes from Puppet Labs but doesn’t have Puppet installed.)

    There are official images for CentOS and official images for Ubuntu as well, in addition to the vast range of user-contributed images. (The official CentOS image doesn’t come with VirtualBox guest additions installed, though, so folder syncing won’t work out of the box.)

    You don’t have to do anything with your choice just yet, just choose one.

  3. Open your terminal or command line environment.

  4. Create a dedicated directory for this particular Vagrant environment to live in, and change directories to that directory. (I personally use ~/term/vagrant/centos-6.)

    mkdir -p ~/term/vagrant/centos-6
    cd !$
    

    (!$ makes use of a Bash feature called “History Expansion.” It expands to the last portion of the last command executed, in this case ~/term/vagrant/centos-6.)

  5. Initialize the Vagrant environment, specifying the base image (box) you chose in step 2.

    vagrant init puppetlabs/centos-6.6-64-nocm
    

    You can run ls and observe that a Vagrantfile has been created:

    $ ls
    Vagrantfile
    
  6. Bring up the Vagrant environment, which (this first time) will also download the base image you chose earlier.
    vagrant up
    

    This may take a little while. Wait for it.

  7. Log in to the Vagrant virtual machine you’ve created.

    vagrant ssh
    
  8. If you want a particular version of Postgres, choose the version of the Postgres yum repository package from which you can download the Postgres package itself. (I chose Postgres 9.3.) Right click and choose “copy link.” Then, inside your Vagrant VM, run the following command, replacing the URL with the one you’ve just copied.
    wget https://download.postgresql.org/pub/repos/yum/9.3/redhat/rhel-6-x86_64/pgdg-redhat93-9.3-3.noarch.rpm
    
  9. Install the package you’ve just downloaded.
    sudo yum install -y ./pgdg-redhat93-9.3-3.noarch.rpm
    
  10. Create a “packages” directory inside /vagrant, to store the Postgres packages outside the VM, where they will be saved when the VM is destroyed. Change to this directory.
    mkdir /vagrant/packages
    cd !$
    
  11. Download the Postgres packages (ignoring the versions present in the default repositories).
    yumdownloader --resolve --disablerepo=* --enablerepo=pgdg* postgresql*-server
    
  12. Exit, and verify that the “packages” directory shows up on your host with three RPMs inside.
    exit
    ls packages
    
  13. Modify the Vagrantfile to include the shell commands to initialize Postgres.

    Change the commented out lines (near the bottom of the file) that read as follows:

      # config.vm.provision "shell", inline: <<-SHELL
      #   apt-get update
      #   apt-get install -y apache2
      # SHELL
    

    And replace them with:

      config.vm.provision "shell", inline: <<-SHELL
        yum install -C -y /vagrant/packages/postgresql*.rpm
        service postgresql-9.3 initdb
        service postgresql-9.3 start
        chkconfig postgresql-9.3 on
        sudo -i -u postgres createuser -d -e -E -I -r -s vagrant
        sudo -i -u vagrant createdb -e
      SHELL
    

    Save the changes.

  14. Destroy your vagrant environment.

    vagrant destroy
    
  15. Bring it up again and log in.
    vagrant up && vagrant ssh
    
  16. Run psql. You’re in.
    [vagrant@localhost ~]$ psql
    psql (9.3.15)
    Type "help" for help.
    
    vagrant=# q
    [vagrant@localhost ~]$
    

Now you can play around, do whatever you like inside the Postgres instance, and just repeat the last three steps (destroy VM, bring it up, and start psql) as often as you need to. 🙂

Did these instructions help? Did you have any trouble? Any suggestions? Let me know in the comments.

Bootstrapping CFEngine agent to a regional (AWS) hub

Hat tip to my DevOps buddy Joaquin Menchaca for this one-liner to find out what AWS region your VM is in:

AWS_REGION=$(curl -s http://169.254.169.254/latest/meta-data/placement/availability-zone | sed -e 's/[a-z]$//')

I am going to use it to bootstrap my Kubernetes VMs to the right CFEngine hub for their AWS region (i.e., to the local hub).